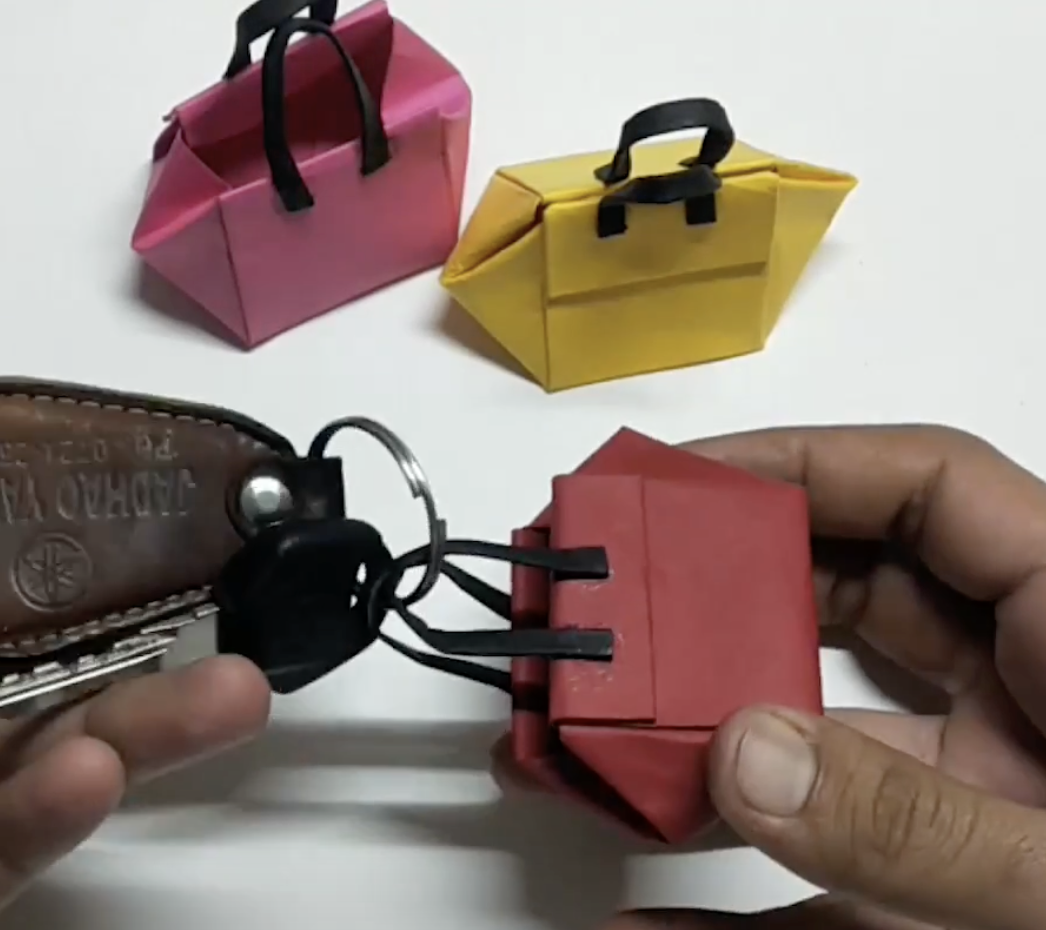
Cute Mini Paper Handbag – An Easy Origami Tutorial for Beginners
Discover the art of creating a miniature paper handbag with this simple origami tutorial. This DIY project is both entertaining and enjoyable, making it perfect for papercraft enthusiasts. Follow the easy-to-follow instructions to craft your very own origami mini paper handbag.

What’s in the Bag? Let’s See What You Can do!
If you’re looking for a fun and easy DIY project, consider making a basic paper purse. With just a few simple materials, you can create a cute and functional accessory that’s perfect for carrying small items like keys, cash, and makeup. To get started, you’ll need some sturdy paper, scissors, glue or tape, and a ruler.
Cut your paper to the desired size and shape, fold it in half, and secure the sides with glue or tape. Add a handle made from ribbon or string, and decorate your purse with stickers, markers, or other embellishments. Voila – you now have a stylish and fun mini paper purse!
Easy Origami gift bag idea. Learn how to make paper bags with handles by the paper folding technique. Simple Paper Purse … source
Step-by-step Tutorial For Making A Diy Mini Paper Handbag
Materials:
- Square piece of paper (you can use any size, but the bigger the paper, the bigger the final handbag will be)
- Scissors
- Glue (optional)
Step by Step tutorial as shown in the video:
- Start with a square piece of paper. If you’re using a regular sheet of printer paper, you can make it square by folding one corner diagonally to the opposite edge, then cutting off the excess. Unfold the paper, and you should have a square.
- Fold the paper in half diagonally, crease it, then unfold it.
- Fold the paper in half diagonally the other way, crease it, then unfold it.
- Fold the paper in half horizontally, crease it, then unfold it.
- Fold the paper in half vertically, crease it, then unfold it.
- Now, bring each corner of the paper to the center of the paper. Crease the folds well.
- Take one of the edges of the paper and fold it up to the center crease. Do the same thing with the other edge of the paper. Crease the folds well.
- Now, take the bottom edge of the paper and fold it up to the center crease. Crease the fold well.
- Flip the paper over and fold the bottom edge up to the center crease again. Crease the fold well.
- Take the right corner of the paper and fold it towards the center crease. Repeat this step with the left corner.
- Fold the top edge of the paper down to the bottom edge, crease it well, then unfold it.
- You’ll see two creases where you just folded the paper. Take the right corner of the paper and fold it towards the center crease, along one of these creases. Repeat with the left corner.
- Fold the bottom edge of the paper up to the center crease, then unfold it.
- You’ll see two creases where you just folded the paper. Take the right corner of the paper and fold it towards the center crease, along one of these creases. Repeat with the left corner.
- Now, fold the top edge of the paper down to the bottom edge, crease it well, then unfold it.
- Fold the paper in half vertically, crease it, then unfold it.
- Fold the paper in half horizontally, crease it, then unfold it.
- At the bottom of the paper, you’ll see four flaps. Fold the two middle flaps up.
- Fold the bottom edge of the paper up to the bottom of the flaps you just folded up.
- Fold the paper in half vertically, crease it well, then unfold it.
- You should see two small pockets at the bottom of the paper. Take the right pocket and fold it towards the center crease. Repeat with the left pocket.
- Fold the top edge of the paper down to the bottom edge, crease it well, then unfold it.
- At the top of the paper, you’ll see two flaps. Fold one of these flaps down towards the center crease. Repeat with the other flap.
- Take the right corner of the paper and fold it towards the center crease. Repeat with the left corner.
- Turn the paper over, and your DIY mini paper handbag is complete! You can optionally add a bit of glue to the corners of the bag to keep them in place.
In conclusion, we have successfully created a mini paper handbag using origami. I hope this tutorial has been helpful and enjoyable for you. Don’t hesitate to try it out on your own or even teach it to your friends. The possibilities are endless with origami!
Please take a look at our blog for more origami project ideas. Additionally, we offer a wide range of colorful paper options that would be perfect for your upcoming paper crafting project.