Bright Paper Flower Burst – Easy DIY

I only needed paper, a scoring board, scissors, and glue. Also, it takes a little extra work for a good flower core. All my steps are shown below.
I liked this project so much that I decided to make another batch for my daughter’s Teacher. Of course, her Teacher loved these since they will last through the end of the school year.
I’m so thankful for Teachers! Here is a snapshot of my delivery to my daughter’s Teacher. She is a wonderful person! I made the paper flowers... placed them in a pen holder… wanted her to have something for now and later.
Bright Paper Flower Burst – Easy DIY
So, I hope you enjoy making your own…for the blooms and the stem, here is my material list:
6 colorful card stock papers. I used a bright 65lb Cover – a good paper grouping is Poptones – pick your favorite 65lb colors.
Green text paper for the stem – We have lots of Green Text options that might be perfect
Tools: Scissors, Scoring Board, Glue
Step #1 – MAKE THE STEM
- Trim the paper down to 2.5-inches x 10-inches
- Starting at one of the corners, you will roll the paper diagonally until you reach the other end (keep it tight as you roll)
- Dab glue at the beginning and the end to keep it secure.

Step #2 – MAKE THE BLOOMS
- Trim card stock down to strips 2.5-inches x 8-inches
- Place card stock against the left corner with the 2.5-inch edge upward and score at .5 (1/2-inch)
- Turn card stock horizontal using non-scored edge – make notches (every 1/4-in)
- This is how your strips will look
- Start cutting

Step #3 – GLUE IT TOGETHER
Get a stem a bloom and glue – time to roll them together

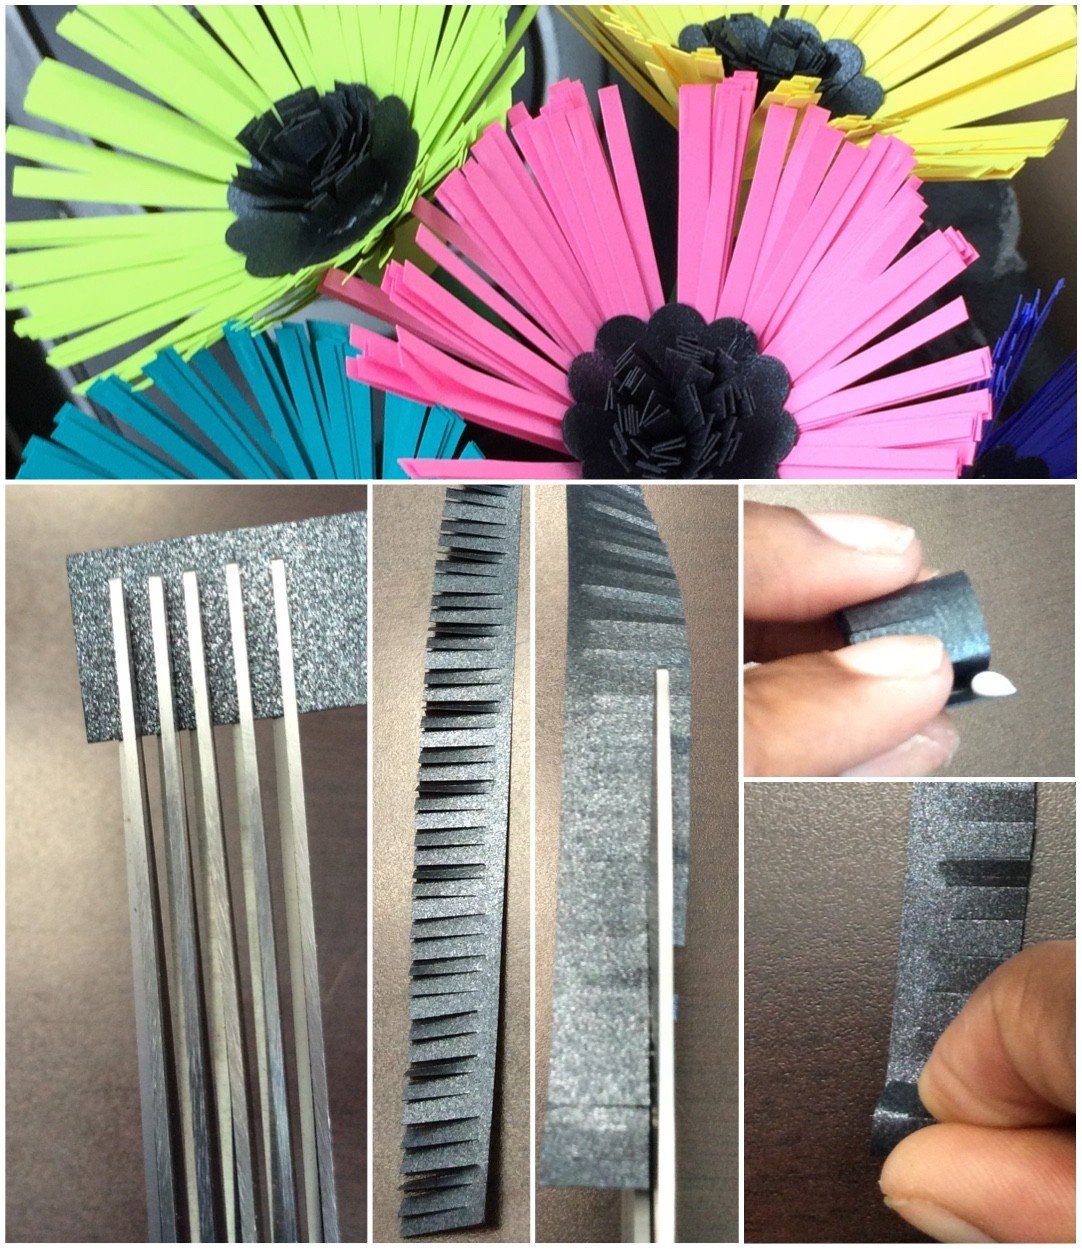
Step #4 – MAKE FLOWER CORE
This step is on an ‘as needed’ basis. It will finish the look of your flower, but you might be able to add other fun items such as a button, jewel, smiley face, or something else fun to cover the core.
We decided to make our core using black shimmer card stock – with a paper punch, fringe scissors, and some glue. Here’s what we did…
I used a scallop punch – cut a piece out of it, and then slit through the center a little bit so I could form to the center base of my blooms.

Then I cut a strip from the same sheet of paper and used fringe scissors to create a fringed edge quickly. As I assessed, the fringe can be a little long, so I trimmed it down using scissors. Once I’m happy with it, I start rolling, glue to secure the roll, then glue into the center. Woo Hoo, it is done and so very lovely!!
Something else fun came from this project… After I made the flowers from paper, I took a photo and created a tutorial for making your own card – check out that link, and you’ll recognize the image – my Bright Flowers! Love projects that can have multiple works produced.