DIY LED Paper Flower Card Tutorial – Light-Up Greeting Card Guide

This super bright LED Paper Flower Card and perfect for any occasion! With this tutorial below we are sure you are able to make a card just like this or customize it to the way you like it! We hope you enjoy making this card!
This fun little card/toy is battery powered with (2) 3-volt coin batteries, # CR2032. It is on a copper tape circuit. The photos show the pattern of the placement of the copper tape. I did cut the tape in half since the Chibitronics LED circuit is a closely placed pattern and the LEDs have to touch 2 of them. I did tear the tape and overlap it. In some places, I used wider tape.
The secret was to use a bone folder to really and truly flatten that tape down into a smooth circuit. The paper was heavy but too flexible to support a steady circuit, so I added a second layer of paper to the back of the card. I put magnets inside so that the battery could be changed. The Extract, Aqua, A7 envelope, Euro flap is 5.25″ x 7.25″. Since the card is a little thicker I cut the card to 5″ x 6 3/4″.
The leaf design is a free online design by Freepiks.com: I am grateful for the lovely design and have used it more than once. I did the front of the card and then cut the holes and did the circuit. Keep referring to the photos.
Helpful Links for some more Info
- LED Lighting Help
- Using Copper Tape with Paper Circuits by Core Electronics
- How to make a simple circuit with copper tape, LED and a battery by Angie Calabrese Barton
Instructions for LED Paper Flower Card:
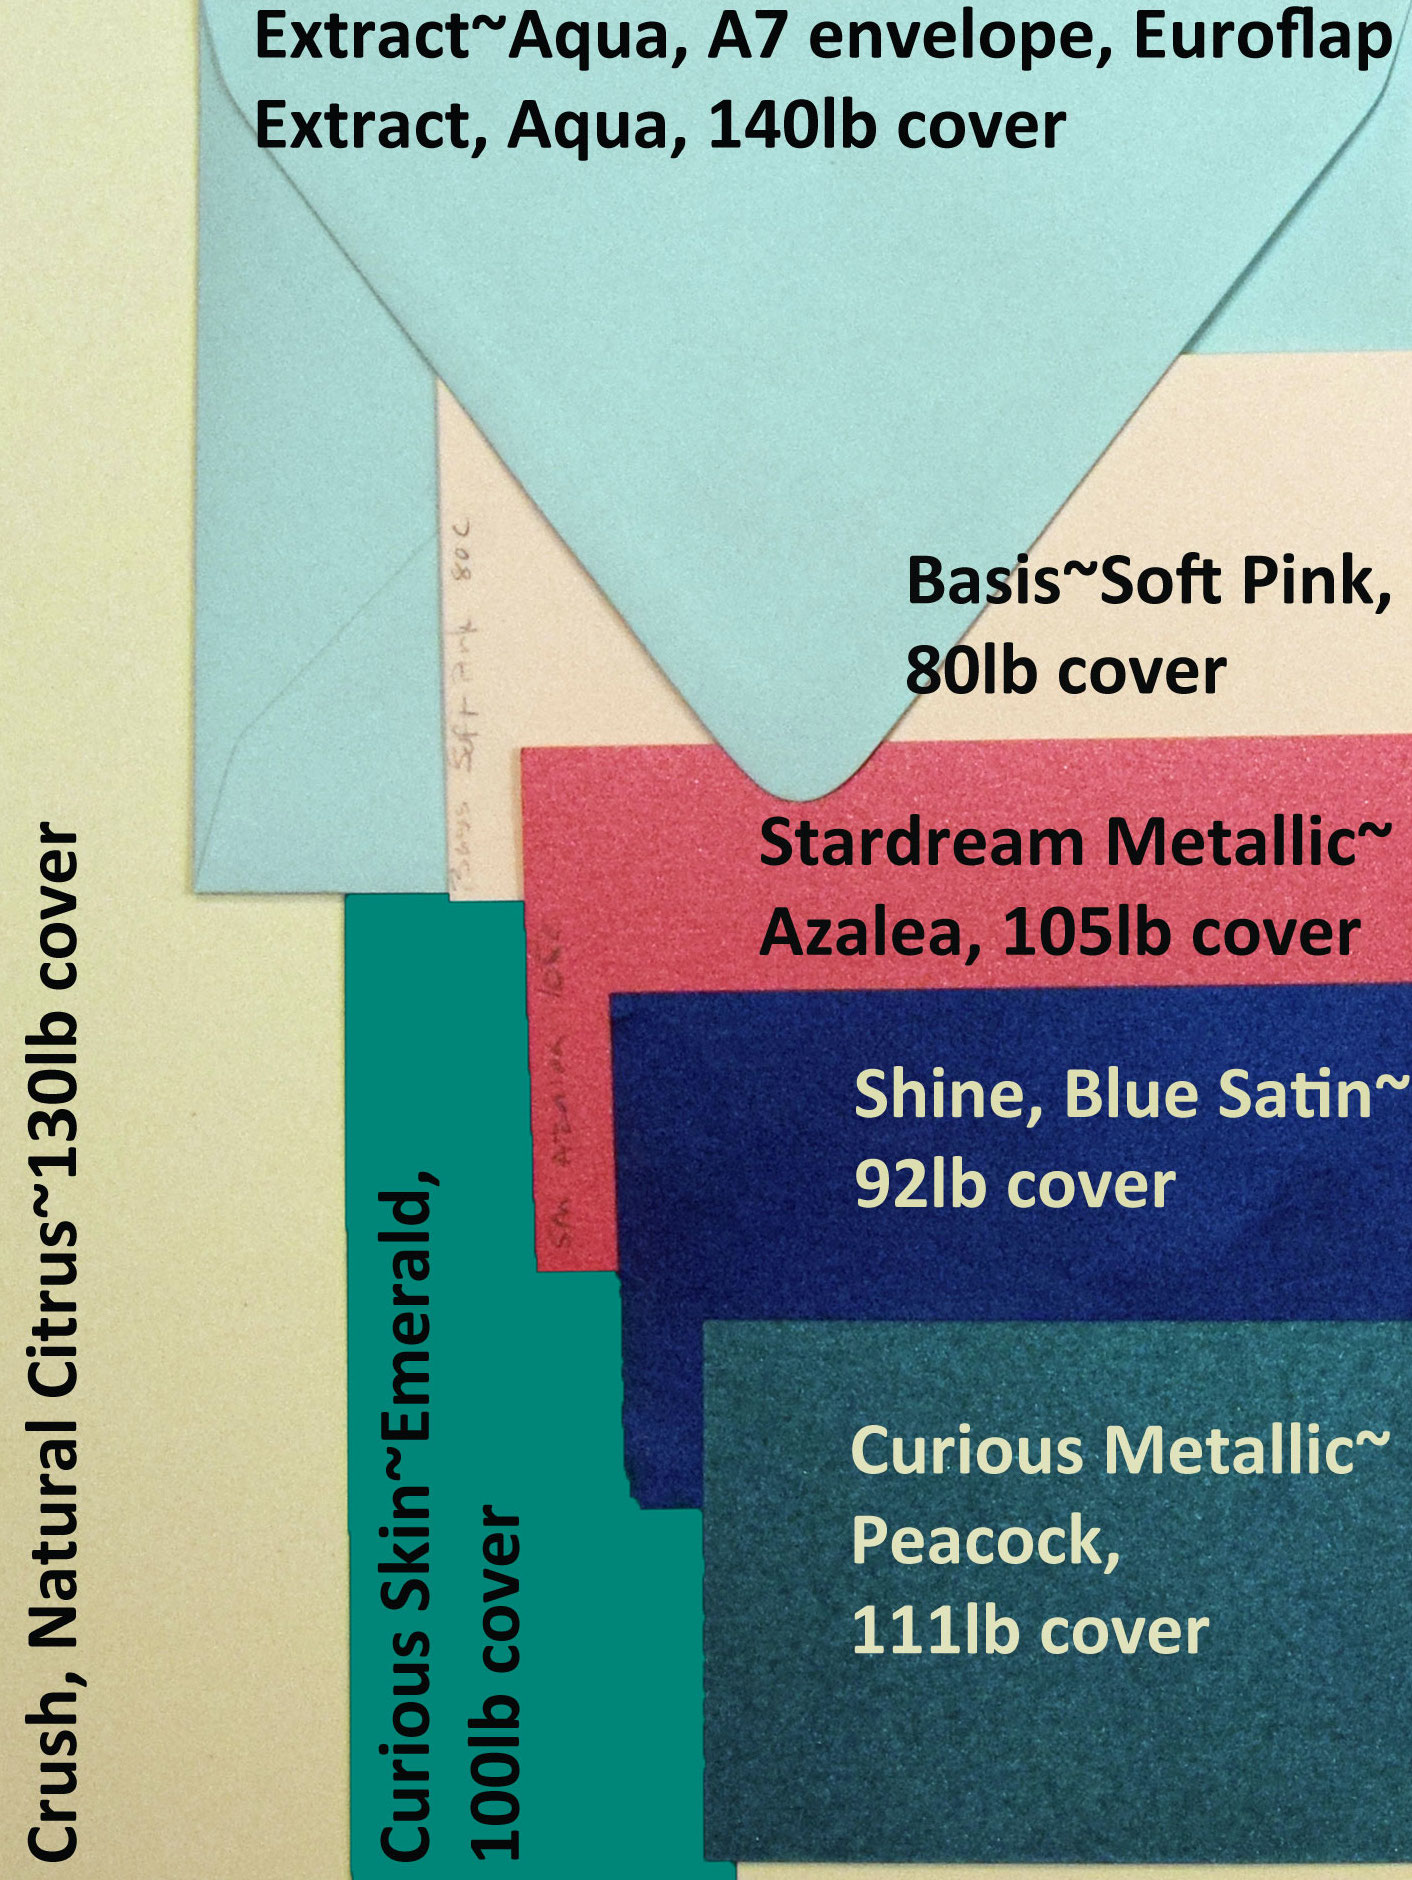
- Print the Crush, Natural Citrus, 130lb cover and the Extract, Aqua, 140lb cover with the included leaf design. Start with the Natural Citrus. The paper is 8.5″ x 11″; score and fold it in half then cut it 5″ from the fold. Mark and cut the other side. You want both the front and the back empty spaces to be the same size. Score the centerfold 1/8″ on each side of the centerfold to make it more flexible which will accommodate the depth of the battery holder. Cut the Aqua to 4 3/4-inch by 6 3/4-inch. I cut it a little longer and trimmed it back to be sure of the size. Silhouette Double-Sided Adhesive paper was used to attach the two papers. Save the backing for a pull tab to put over the battery to keep it from accidentally turning on.
- Using the Curious Skin, Emerald, 100lb cover and Memory Box, Prim Poppy, along with Memory Box, Dancing Tulips cut the flowers and stems. The colored papers are placed over the tops of the flowers’ designs. Cut a second Prim Poppy and attached it to the left of the actual die cut. I free cut the stem and there is not a green poppy flower under the dark blue flower. Leave room for it when you glue down the die cuts. Attach them with Cosmic Shimmer Acrylic Glue and a toothpick.

- Using the paper, cut the top of the flowers. From left to right I did the papers in this order. Basis, Soft Pink, 80lb cover, Stardream Metallic, Azalea, 105lb cover, Shine, Blue Satin, 92lb cover, Extract, Aqua, 140lb cover, Curious Metallic, Peacock, 111lb cover. Glue them down.

- Use a circle guide and draw little holes above the tulips. Those are 1/4″ circles. Use an Exacto Blade to cut out the circles. I tried to space out the LED lights so that the copper circuit would have enough room to space out the lights. Use a thin pencil to draw through those holes, to place the LED lights on the inside.

- I suggest if you have not done a copper circuit before you stop and watch the videos. I spaced the coin battery halfway up the inside of the card so that the magnets don’t interfere with the batteries. Each LED light is 3 volts so I used (2) CR2032 coin batteries stacked and taped with a thin piece of ScorTape with the backing left on the outside. There is a positive and a negative side to the coin batteries. Be sure to stack them so that the top is negative and the bottom is positive. The copper tape separates the current, which only completes the circuits when the top of the coin flap is folded down.

- Cut a piece of copy paper to 1/2″ x 3″ then score it and fold it in half. Use a piece of Silhouette Double-Sided Adhesive paper on the bottom half and attach it about 1/16″ from the card edge and in the middle of the card, so it is evenly spaced from the magnets. Put this down before you do the copper tape.

- Once you can see, on the inside of the card, where the LED lights go, draw the circuit with a pencil. The LED lights are 3/8″ long and there is about 1/8″ between the copper lines. Be sure that the copper tape that you buy conducts electricity. The one in the materials list is sold on Amazon. Refer to the photos to see the circuit. Be sure that when you cut the tape that the next piece overlaps by about 1/2″ and don’t stretch it. You can see that the positive and the negative circuits don’t connect at the top. The only place they connect is in the battery box. Use a good bone folder and press gently, over and over to lay all the tape very flat. Where it bubbles it doesn’t conduct well. I cut the tape in half and tried to make turns at the corners but was not always successful so I went over it with wider tape. Press, press, and press again.

- My batteries are placed positive side up, so referring to the photos, run the copper tape over the bottom of the coin battery holder and also up and over the flap. Use the 1/4″ size Recollections Foam Adhesive Strips and build a box to hold the coin batteries. Add one full layer around the batteries and then add a second layer around the 3 sides. I didn’t put a second layer on the side near the fold so that it would be sure to connect well when the flap was folded.

- The Chibitronics Light Sampler has a variety of colors. I used 2 pinks, 2 blues, and 1 green in that order; left to right.

- Tape the little 1/4 inch magnetic discs by Basic grey in each corner. There is a positive on one side and a negative on the other. They are taped on with Scotch tape. Over them, I tape some colored tape so that the magnets would not be so strong. I don’t have the manufacturer, so it was probably tape from some package. The colored tape is 1″ wide and cut to 1/2 long. I put it on the Silhouette Double-Sided Adhesive Tape first and placed it over the magnets.

- Print the “Push” word on the Extract, Aqua and die cut it with a circle die that is 1.25″ big. I used 1/2″ ScorTape on the top and bottom of the Aqua and applied a die-cut circle of heavy plastic saved from the packaging. The plastic circle will protect the push button. Place some ScorTape and glue on the back and place the circle over the battery. Find the magic spot where the battery works and put it there.

- Cut the “Pull to Use” and cut it to 2.25″ x 1/2″. Cut a piece of backing from the Silhouette Double-Sided Adhesive Sheet and cut it to 1/2″ x 4 3/4″. Score and fold the paper to 3 1/2″, then tape the print to the backing. Put this under the battery holder flap to keep the LED lights from turning on early.
- This was an experience that turned out well. Enjoy!
We hope you enjoyed making this LED Paper Flower Card! Make sure to tag us on Instagram with your creations! We would love to see it!
Materials Required for this
- Crush
- Natural Citrus, 130lb cover
- Extract
- Aqua, 140lb cover
- Aqua, A7 envelope, Euroflap
- Curious Skin (check out Green Paper)
- Emerald, 100lb cover
- Basis (check out Pink Paper)
- Soft Pink, 80lb cover
- Stardream Metallic
- Azalea, 105lb cover
- Shine
- Blue Satin, 92lb cover
- Curious Metallic (check out Green Paper or Metallic Paper)
- Peacock, 111lb cover
- Silhouette Double Sided Adhesive Sheets
- Memory Box, Prim Poppy
- Memory Box, Dancing Tulips
- Copper Foil Tape [1/4 Inch x 108ft, Pack of 2] Copper Tape Conductive Adhesive
- Recollections, Foam Adhesive Strips
- 1.25″ Die Cut Circle
- Scotch Tape
- 1″ Colored Tape, heavy duty
- Magnetic Discs, Basic Grey, 1/4″
- Chibitronics, Lights Sampler (30 Lights)
- 2 Coin Batteries, CR2032
- Cosmic Shimmer Acrylic Glue
- Recollections, Foam Adhesive Strips
- Exacto Blade
- Plastic Sheet saved from packaging, 2″ piece
- 1/4″ ScorTape