Warm A Heart With A Polar Bear Card
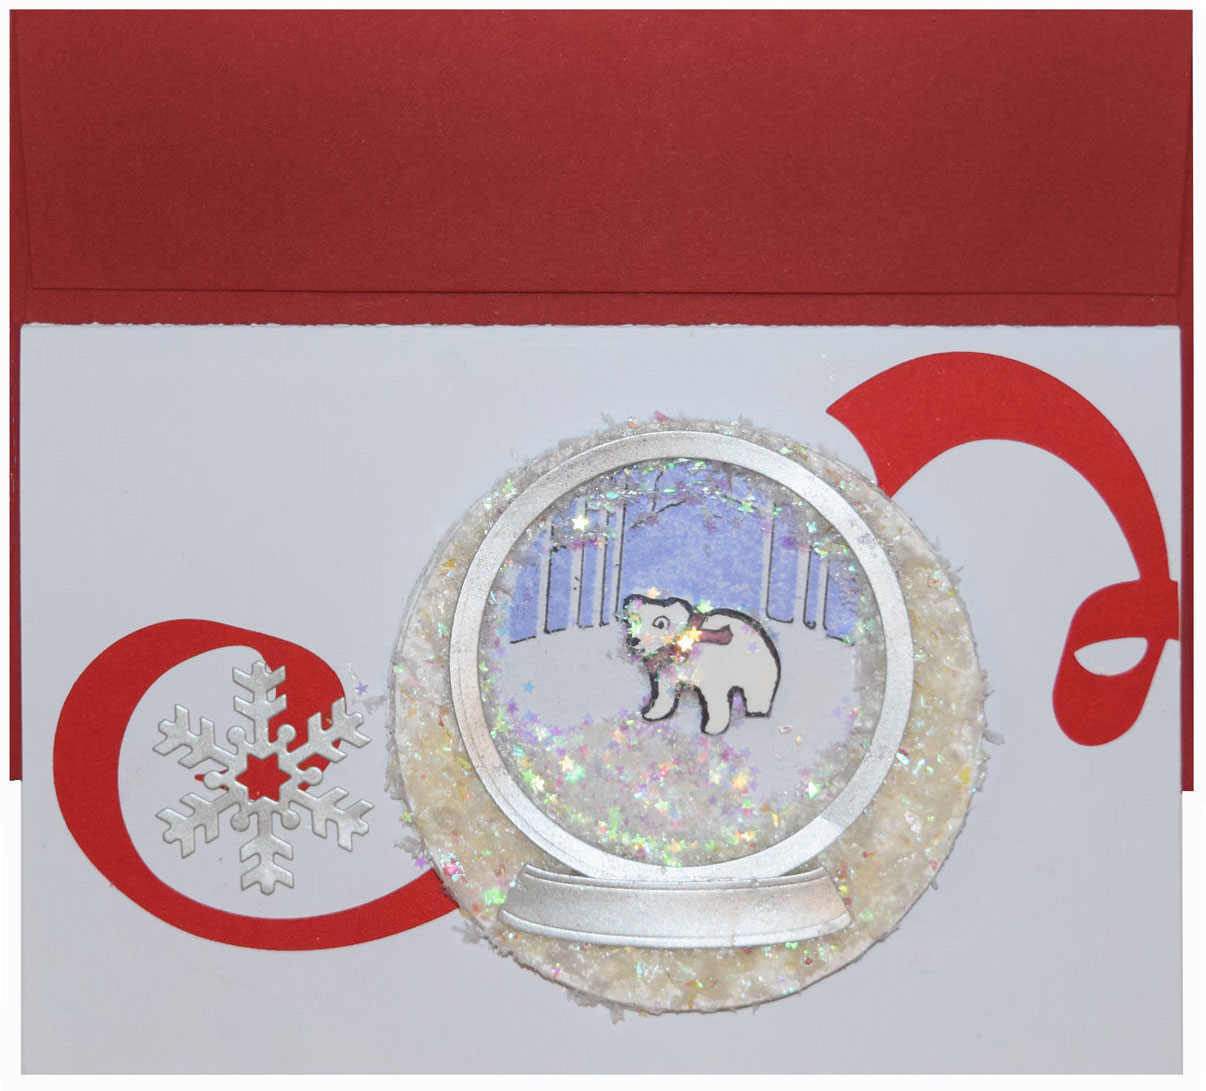 Snow or no snow, wherever you live, January is a cold month. What better way to embrace the cold than a polar bear shaker card. This card is easier than it looks, it takes the shortest distance between two points for making a frame and embellishing it. Soft warm colors are to warm up the message: cold can be fun. For all the fluff, it will assemble quickly as each element is big and simple. It is just fluffy. Keep in mind that a lot of the supplies can be substituted; use what you have on hand.
Start with your base card, a heavier card stock, Cranes Colors, Blue Azure, 134 lb cover. Score and fold it in half. The heavier cardstock will hold the snow globe, shaker decoration, with ease. In the 100% Cotton, Savoy Paper and Envelopes, there are some heavier papers: 236 lb cover, Bright and Natural Whites. The 4.25″ circle die cut will cut 3 per page. Use 1 page of each for a total of 6 circles.
The next part takes some attention, but you don’t have to be too exact; the fluffy snowflakes will cover uneven edges. After you have 6 big circles use the 3 3/8″ circle to cut a hole in each one, as close to the top as you can get, which is about 1/4″. You need to leave room for the snow globe base die cut: the inner circle of the snow globe die cut is also 3 3/8″, which is convenient.
Keeping in mind that the Big Shot pro has pressure issues in the middle of the roller, the circles partially cut out and Tim Holtz scissors completed the cutting. 236 lb cover is pretty thick. You could cut the circles by hand. The inner, 3 3/8″ circle needs to be a little more accurate and carefully aligned. Interestingly, the smaller die, from the same die set, did cut completely.
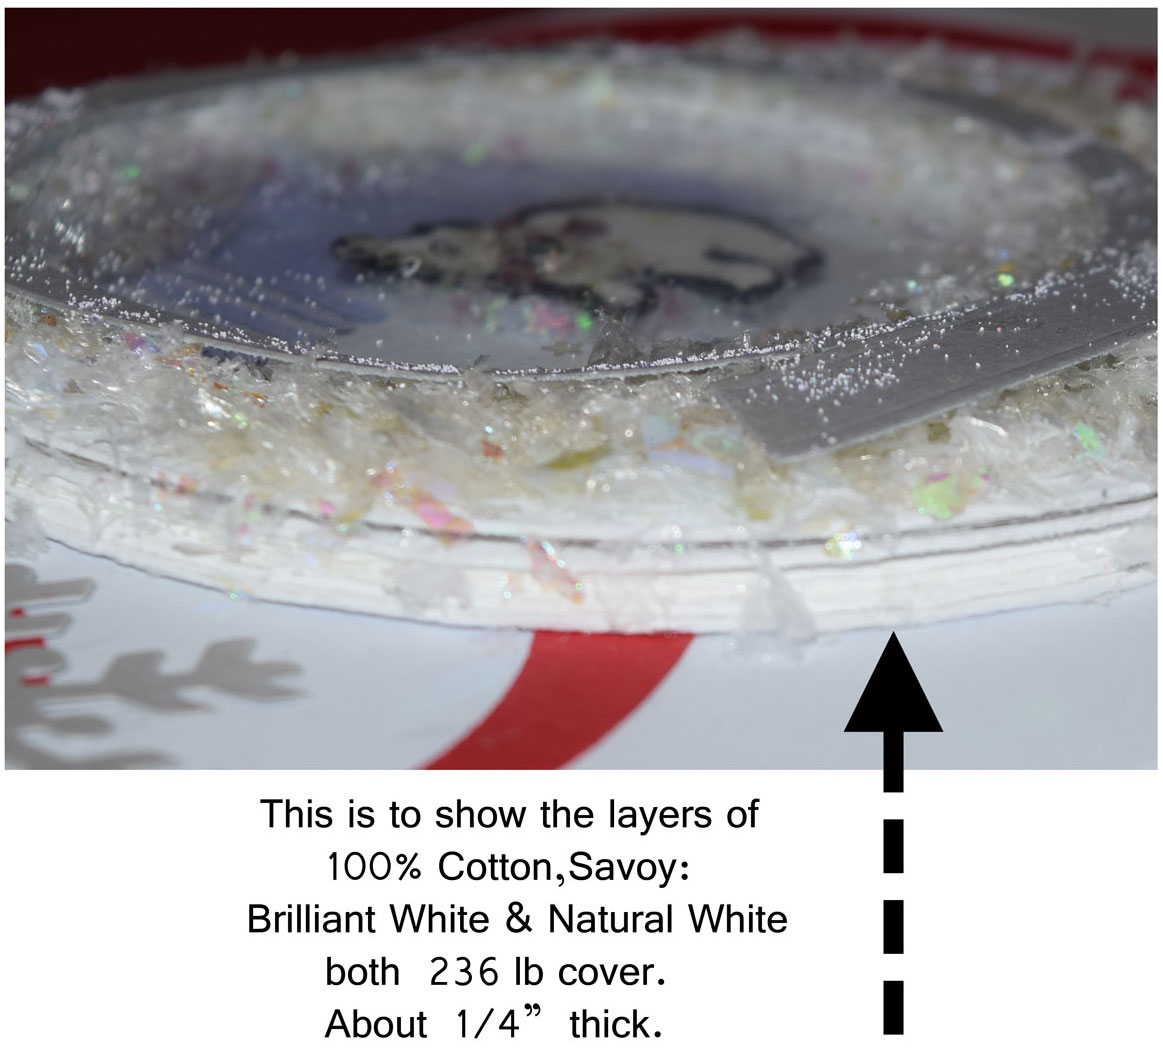 Once you cut the first one, use a fine line pencil and mark 3 area around the circle for alignment, starting at the thin cut at the very top. I didn’t perfectly center mine, since fluff covers all, however each was cut out almost exactly like the one before, so when glued together, they matched well. Also cut 1 large 4.25″ clear plastic circle from saved packaging. At this time, also cut a snow globe from the FAV Shimmer, Pure Silver, 92 lb cover.
Using Cosmic Shimmer Glue and a Q-tip, apply glue to each layer, pre-aligning them so you get the inner circles to match. Cover the area, but don’t apply so much glue that it oozes from the sides. One by one, glue the 6 layers together adding the clear plastic before the final circle is glued down. Hold it and smooth it around the circle for a few minutes; it adheres pretty quickly. Add some glue to the top layer and add the snowflakes. If it is not thick enough, go back and add more glue over the snowflakes and add more snow. Press it down with your fingers a little bit.
Glue the Pure Silver snow globe base piece down, overlapping the base a little bit. Set the whole thing on wax paper in case any glue is on the outside, so it doesn’t glue to a surface. The bottom circle should be clean enough that you can put it on the Azure card and mark 3 pencil lines, inside the circle to align your Polar Bear Globe stamp.
The final snow globe, from the inside of the Pure Silver, Snow Globe, is aligned on the card about 1″ from the top and 2″ from the right. Set it back on the wax paper. Refill your Tim Holtz pad with the Shaded Lilac ink and apply liberally to the stamp, using a vertical press motion, so you don’t get ink in the grooves. It has an extended drying time. Line the stamp up with the circle on the Azure card, press and hold for a few minutes. The 100% cotton surface is absorbent and will soak up the ink well. Stamp another polar bear on some scrap Savoy paper and hand cut out the polar bear. Using black and red sharpies, outline the bear; ink the paper sides and color the scarf, adding a little red glass sparkle.
 Using 1/16″ foam, glue 3 small pieces to the back of the cut out polar bear and glue over the flat stamp of the polar bear. Carefully pile some Martha Stewart’s Iridescent Stars Glitter around the bear. If they are on top of the bear, push them onto the stamp. The bear is right under the plastic and it is hard to shake them off later. Use more than you think you need, since it settles into the edges. Brush any stray glitter into the stamp area and glue down the snowflake globe. Cover the bottom of the globe completely with a generous amount of glue, since the sealed globe is what keeps the glitter in the globe; just not enough to ooze. Apply a little less to the edges since it will push outward when you press it down.
Die cut Wild Cherry with the QuiKutz, Confetti, die. There are other designs that would also suit, even straight lines cut from the Wild Cherry; it is the yummy color that makes the design work. Also cut a snowflake from the Pure Silver. Cut the Wild Cherry curlicue so it fits on either side and glue down both the Wild Cherry and the snowflake. Let it dry on a flat surface overnight. It will fit inside a Cherry A9 envelope however it would be preferable to hand deliver it or enclose it with a gift or put in a firm box. The card is not fragile, but it has an odd shape that might not mail well. But what a gift it is to receive.
Enjoy!
The products that were used in this craft:
- Cranes Colors, Azure Blue, 134 lb cover
- 100% Cotton, Savoy Paper and Envelopes TRY-ME Pack : 236 lb Brilliant and Natural White
- FAV Shimmer, Pure Silver, 92 lb cover
- Pop-Tone, Wild Cherry, 65 lb cover
- Crush, Cherry, A9 Envelope
- 3 3/8″ Circle Die Cut
- 4 1/4″ Circle Die Cut
- Memory Box, Polar Bear Globe
- Memory Box, Grand Snow Globe
- Buffalo Snow Flakes
- Snow Flake Die Cut, 1 3/4″
- QuiKutz, Confetti, Die Cut
- Tim Holtz: Distress Ink, Shaded Lilac, & Scissors
- Heavy Clear Plastic Packaging: 4.5″ minimum
- 1/16″ Pop Up Foam
- Black and Red Sharpies
- 1 Little Red Sparkle
- Martha Stewart’s Iridescent Hearts and Stars Glitter
- Cosmic Shimmer Acrylic Glue