Handmade Wedding Card – I DO Love Cards

Making a special handmade wedding card for a friend or family member for this special event allows you to express your joy in their commitment to one another! So make sure to check out how to make your own I DO Card.
Nothing is more romantic than a spring wedding with guests celebrating a lifetime of happiness for the couple. For the celebration, I have used white cards, with embossed and gilded layers. Later they can be mounted in shadow boxes for keepsake memories.
Hand making a special card for a special moment is offering a lifetime of memories for the bride and groom. It will keep their wonderful day alive as the years go by, and they build their lives together.
Instructions for Handmade Wedding Card:
Refer to the photo. Die-cut all of the shapes so you can lay them on your paper and see how you like your design, then apply the red liner tape around the edges. Leave the red liner on the tape Until the last step. I embossed all of my pieces ahead of time.
And cut the branches. The Hinted Gold background Cover stock was cut to 4.25″ X 6.5″ and embossed with tiny dots. The Heart dies come in several sizes and I picked the large and one that fit inside. You could hand cut those. Emboss the hearts with the oriental folder on the gold and something that crisscrosses on the smaller white one. Die-cut the branches and pick a flower.
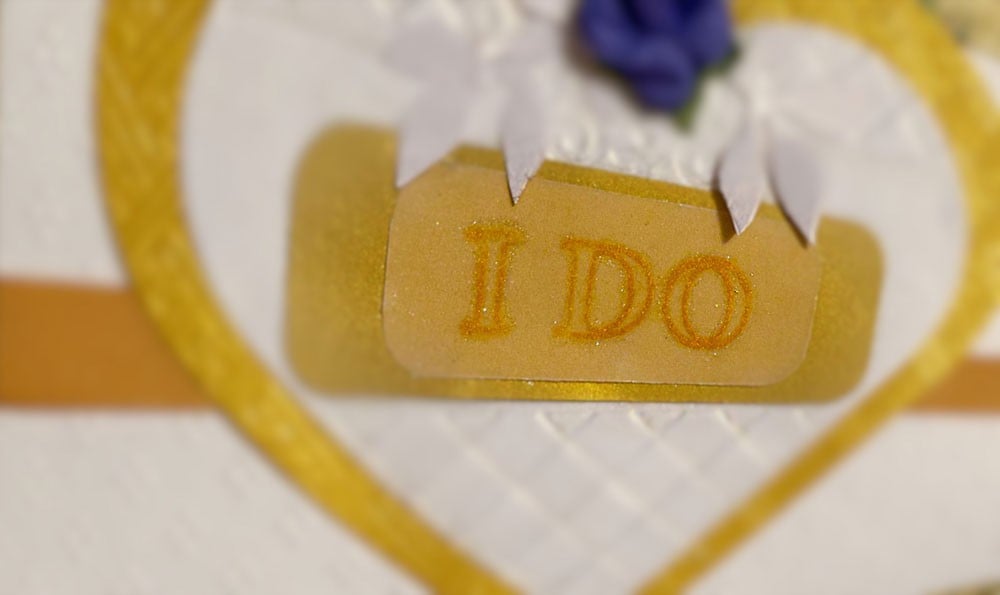
Build your heart. The gold background for the ” I DO” is 3 3/8″ X 1.25″ and the vellum is 1″ X 2 3/8″. Cut what fits inside your hearts when they are nested.
The Vellum was stamped with the glue stamp and brushed with perfect pearls. It set for a min or two and I brushed it off with another little paintbrush and a Kleenex after it was really dry. Maybe for 5 minutes. Outline with the glitter pen.
I put the heart layers together first using red liner tape. I used spray adhesive on the back of the vellum and mounted it on the gold strip and then onto the embossed Hinted Gold and so on. Reference the photo for the layers.
Mostly, just alternate colors so they stand out. I wrapped the ribbon around the background layer, so it came to the bottom of the gold ” I DO”. I used red liner tape to wrap it around the Tiny Dots layer before I mounted it onto the card. I only used tape on the back. The heart will hold it in place. Take the red liner tape off the folding card and mount the large white background with the ribbon.
Gild the red liner tape that shows. Just drop on flakes, use your Rub ‘n Scrub to burnish the flakes into the tape fairly hard. Using more red liner tape, mount the hearts. You are DONE.
Materials for Handmade Wedding Card:
- 5″ x 7″ White folding cards with envelopes.
- Paper-Papers:
- Stardream Metallic:
- Fine Gold Cover
- FAV Shimmer:
- Hinted Gold Cardstock
- Stardream Metallic:
- Note: I used the Sizzix Big Shot but you can use your own
- Clear Vellum
- Embossing Folders: Cuttlebug, from the Oriental Set & Thank You Set & Tiny Dots
- Sizzix Dies: Hearts & Branch with Leaves ( Medium)
- Sizzix stamp: ” I DO”
- Tim Holtz Perfect Pearls: Gold & Glue Stamp & two paintbrushes – cheap – & a Kleenex
- Recollections Purple Flower – use your favorite
- Red Liner Tape, 1/2″ & spray adhesive
- Cosmic Shimmer Gilding Flakes: Inca Gold & Tim Holtz: Rub ‘n Scrub
- Gold Silk Ribbon: 1/2″ wide – about 8″ long
- Sakura Gelly Roll: clear glitter pen- optional